Saturday, October 24, 2026

Recreating Mom's Cabbage Rolls


My mom used to make cabbage rolls or stuffed bell peppers about once a week when I lived with her while going to college.  With Julie out of town this week to take care of our grandsons in California, I thought it would be a good time to try making one of those dishes, because Julie dislikes the smell of cabbage and peppers.

I like the consistently sweeter taste of cooked cabbage a little better, so I went with that option, but the same meat can be used to stuff bell peppers (any color).

In fairness to Julie, the cabbage boiling proved to be quite aromatic.  To me, cooked cabbage smells sweet, but I guess that depends on personal olfactory sensitivities.

Gina and Laszlo came over for dinner.  We all liked them.

I will say that on this first attempt, I used canned Signature Brand Crushed Tomatoes with Garlic, which for me were too garlicky.  As Gina and Laszlo said, that suited this particular audience.

I have only faint memories of Mom preparing the meat filling but remember how it tasted and looked.  I watched Rachel Ray on Youtube preparing something similar, but in a more complicated way.  I also looked up some recipes online to see if any others had insights.

These recipes all turned out to be for double batches, so Gina and Laszlo will help me finish the leftovers for dinner today. For what it is worth, I served it with a loaf of French Bread, with only a few pieces sliced off, because we love the bread but avoid the carbs.  There's plenty of bread left for the second meal.

While the preparation was time consuming, this is much simpler than the recipes I found online.  You probably have more seasonings than I do, so you can add that fennel seed, sage and whatever else they recommend or you intuit.

Key points I took from scanning recipes were cook it for an hour and a half or two hours, plus the amounts of major ingredients like meat and rice, which were also not exactly set in stone.

I used two pounds of 93% lean ground turkey.  Perhaps a pound of sausage and a pound of beef in place of one or both pounds of turkey would be tastier.  Vegans can easily substitute Beyond Beef or some other factory made faux beef, and whatever egg substitute they might like.

I would think tofu could be substituted for meat, but it would probably have to be put through a food processor or perhaps not have the rice and spices blended in.


INGREDIENTS: 

1 whole Cabbage (get a large one)

2 pounds of ground meat or meat substitute

1 egg

1 cup of uncooked long grain rice

Salt and Pepper

Crushed Red Pepper

Onion Flakes (a whole onion can be substituted)

2 crushed Garlic Cloves (if you desire rather than powdered garlic, tomatoes with garlic, or no garlic)

Most people would use garlic, but I don't have garlic and didn't want to buy a big container for this one dish when my wife doesn't like the smell of garlic, which explains why I bought Crushed Tomatoes with Garlic, which cost the same as without Garlic.

Two 14 1/2 cans of Crushed or Diced Tomatoes (As I think back, I think my mom simply used tomato juice, though I remember something thicker on top, like maybe tomato paste?  I would think you could easily substitute marinara sauce).  For the first batch, I used Signature Brand Crushed Tomatoes with Garlic, which to me was too garlicky.  Maybe one can without garlic and one with garlic?

I tasted the Signature Crushed Tomatoes with Garlic and found it not quite a sweet as I imagined it might be, so I put just a couple of dashes of Nutmeg and Cinnamon on top, basically using the chef's prerogative of seasoning to taste, although I actually didn't know how that would taste until it cooked.  I think it made it slightly sweeter.

Plus Quick-Clean Cuisine standards Aluminum Foil and Parchment Paper to make cleaning your baking dishes easier.


Step 1: Rinse the outside of the cabbage and boil the whole head.

Some recipes say to cut out the core before cooking, which might be better, but it is also a chance to cut yourself and be rushed to the emergency room pushing a sharp blade into oa hard cabbage core in an awkward position rather than just wasting a little energy to cook the cabbage until it is easy to peel the cabbage leaves off.

A mistake I made was cutting the cabbage into quarters so that it would fit in the big pot I used to boil it with less water.  I would say maybe cut it in half if necessary to fit, but a whole cabbage obviously provides bigger leaves as the wraps.

Bring the water to a boil and then keep it in a light boil for 20 minutes.  I would advise not using a lid, although using one does conserve energy, unless it boils over and gets all over the stove, which then takes more of  your energy to clean up.


Step 2: Line your 8" X 12" Baking Dish or some combination of smaller baking dishes with Heavy Aluminum Foil or two layer of lighter foil.  I only used one layer of light foil and what turned out to be a rather saucy dish bled through, requiring me to uncharacteristically soak and scrub the baking dish later, despite also using parchment paper on the bottom.  NO BUENO! 

Add a layer of parchment paper above the foil.  To reiterate, thin foil plus parchment paper did not prove to be a sufficient barrier. 


Step 3: If you are using fresh onion, mince it on a large cutting board with a ridge around the edge that you might have used to cut the cabbage in half or in any case will use later.

If you want fresh garlic, do that thing where you turn a knife sideways and pound it to crush it. That's the fat side of the knife, not the blade line. Maybe 2 cloves, unless you really love garlic, then no more than 6 cloves, I would guess, based on recipes I saw.  As I said, I skipped this step.


Step 4:  While the cabbage boils, you could make the meat filling in a big mixing bowl separately, which is how Mom did it.  I remember he using that pink and white Pyrex Bowl she used for many cooking projects.

But, of course, I am the Master of Quick-Clean Cuisine.  I began this project with a few hours to spare. so I waited for the cabbage to boil.  I put the cabbage on a large cutting board with a ridge to stop water from flooding the countertop.

I mixed the meat filling in that pot  I mean, what was it going to do, make the filling taste like cabbage that it would soon be wrapped in?  I advise you to do the same, unless you are in a time crunch to get the meal cooked and don't mind washing big bowls.  If you wash your own dishes, you understand why.

Put a pound of meat in the pan.  Make a golf ball-sized indent in the middle.  Crack the egg and put egg white and yoke in that hole.  Sprinkle on Dried Onion Flakes or minced onions.  Add Salt and Pepper in reasonable quantities.  You can always add Salt and Pepper later, but  you can't take them out.

Add Crushed Red Pepper in an amount you think you and your guests will like.  More, less or not at all will work, depending on those dining.

If I had All Spice, I probably would have added a pinch or two of that, and there are other herbs you might like and think would work.  However, I find the simplest spices make things taste just as good and usually better than more complicated ingredient lists, unless you are professional chef who has thousands of hours of experience experimenting with them.  In any case, everything in moderation, at most.

Add a cup of Uncooked Long Grain Rice (NOT Minute Rice or Brown Rice, which cook too fast and too slow, respectively) .

Put the other pound of meat on top of that concoction.  Take off your rings and squish it all together with your fingers.

Of course, it goes without saying that you washed your hands before beginning to cook, and that you don't handle anything else with those meat-smashing hands.  I guess you could wear those disposable thin plastic gloves, if you have them, which would probably be better hygienically but not environmentally.

Step 5: Flatten the meat and rice concoction in the bottom of the pan or mixing bowls and score it with your hand like a pizza, cutting first in half, then quarters, eighths and sixteenths, successively.  Squish them together into little sausage logs.

Step 6: Pour one 14 1/2 can of Diced or Crushed Tomatoes into the baking dish or divided proportionally between smaller baking dishes.  Because this is just a can you are discarding, don't worry about washing your hands to handle it, as long as you dispose of it properly.  I put it inside a grocery bag with other packaging waste.

Step 7: Wrap the logs into Cabbage leaves and set them in the baking dish atop the Crushed or Diced Tomatoes.  Proceed to do this for all of the meat.  If you cut the cabbage into smaller chunks to cook them, like I did, then you will need to use two or three partial leaves to wrap them.

At some point, you might find yourself without any leaves large enough to roll.  Do not panic and rush to the store to buy more cabbage.  I just put smaller piece of cabbage into the baking dish, put the remaining logs on top and then covered them with more small pieces of cabbage.

It became more of a cabbage roll casserole for about half of the dish, but by the time they finished cooking, it was hard to tell which was which.  It might even be better as a casserole, which had more cabbage, albeit smaller pieces.  

Step 8: Pour the other 14 1/2 ounce can of Crushed or Diced Tomatoes on top.

Step 9: Bake at 400 degrees Fahrenheit for two hours.  Some recipes said 1/2 hours, and some said 2.  I split the difference by not pre-heating the oven.  I also used a Convection Oven, which reduced the heat to 375 degrees.

Step 10: Remove the dish from the oven using pot holders or oven mitts and place it on a hot plate to be served with a large spoon.  I think French Bread makes a nice side dish.

Tuesday, November 23, 2021

Proud Marys

This was previously posted in Wes's Travels (CruisePlanners1.Blogspot.com)


A few years ago, our daughter Gina decided to revive my mother's practice of making fruit cake as gifts for friends and family at Chistmas time.  Soon daughter Amy had joined the cause, and an annual annual tradition was born.

Every year, they've continued to crank out dozens of fruit cakes wrapped in colorful Christmas paper.    It rapidly became a family favorite, especially with my sister Darlene, her husband Brooks and their son Brooks.

Some years, the production line burgeoned to include more family members.  With Jay and Sasha flying in from California to join a pre-Thanksgiving gathering this year, we put plenty of shoulders to the wheel when Gina spread out the pre-sorted and prepped ingredients under a new set of directives.  It should be noted that as always, Gina bought all of the ingredients, which definitely adds up to be a significant contribution.  The  new mission for 2021 was layed out in this e-mail from the Fruit Cake Roller In Chief (FCRIC) unveiling a design and production overhaul for 2021:


Hi Sasha and Amy,

I thought I would share with the two of you (and I'm cc'ing the blogger and award-winning cherry chopper who has preserved our legacy of fruitroll innovation) my current plans for 2021 fruitroll experimentation.  We can further improvise when we're all together, but to the extent I can I'll get the shopping and perhaps chopping done in early November (and where linked below, I've already ordered some stuff), so thought I'd share.

Reformulation goal: Cherry reduction


Variations: Full cherries both colors, reduce both colors to 1/2, replace red 1/2 with craisins, no cherries.

(I'll shop with the original recipe in mind, except substituting GF graham crackers and reducing to 0.5 lb red and 0.75 lb green candied cherries -- to be prepared as 4 half batches)

Roll goal: Attractive bite-sized energy balls

Variations: Hand rolled, Sasha's candy molds, my metal baller and stackable meatball kit 

(I just received the linked items from amazon along with this spray that I thought might help)

Coating goal: Add crunch, sweetness, visual appeal, and/or ease of serving and eating


Variations: GF graham cracker crumbs, cinnamon+coconut sugar mix, cocoa powder, powdered sugar, crushed cereal

(I'm not sure if this should be on day 1 or day 2 after refrigerating; also cereal is a new idea -- maybe chex or rice crispies?)

Packaging goal: Freezer and travel friendly yet pretty under a tree

Variations: Packed in wax paper or mini-muffin cup lined tins or boxes with cute tags

(We could also just see if traveling with tupperware and then repackaging on site for gifting is a better plan)

Almost certainly one or more of the above variations will be eliminated as we go, but it should be fun, and we still have Thanksgiving weekend to fall back on if we feel a more traditional prep would help, especially with Gifford gifts.

Gina 


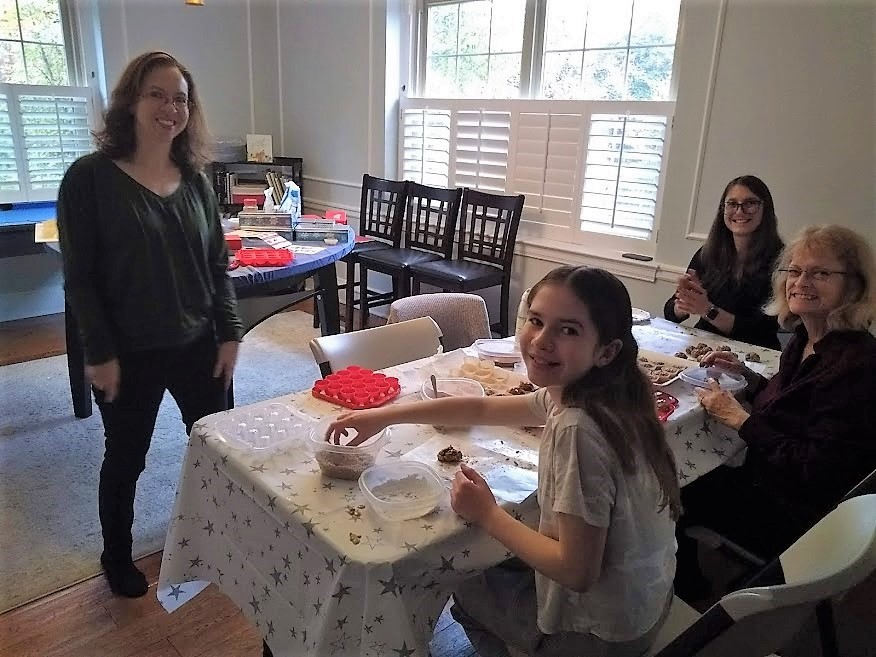
I must confess that as a traditionalist, I was skeptical, but given the task of operating a cool meatball mold to crank out 16 fruit roll balls at a time drew me in.

That's one of the FCRIC's supervisorial tricks, to implement policies that engage her elves in a team effort.

This year, Amy took on the muscle flexing task of stirring in all of the ingredients on the stove top. She then dishing out gloops of hot dough to be molded into balls by the rest of us.

My mold got a big glop the first time, which proved less than optimal, thereby replaced by 16 individual dollops more the size of the finished products.  Jay manned the single meatball tongs.

Julie, Emma and Sasha would take our rough shapes and hand roll them into more perfect spheres.  Sasha and Emma also took some glops of dough to form their own spheres.

Taking one for the team, I ate a hot sphere and thought that they might be too sweet.  It tasted like a chunkier, non-chocolate hot fudge.  After they cooled, however, they proved to be just right.

The team proceeded to roll the balls in various coatings.  

Sasha, who has never been the world's biggest fan of fruitcake, suggested replacing proposed crushed cereal topping with decorative candy sprinkles, which added crunch as well as color.  She smiled saying those festive sprinkles reminded her of Christmas projects when she was a child.

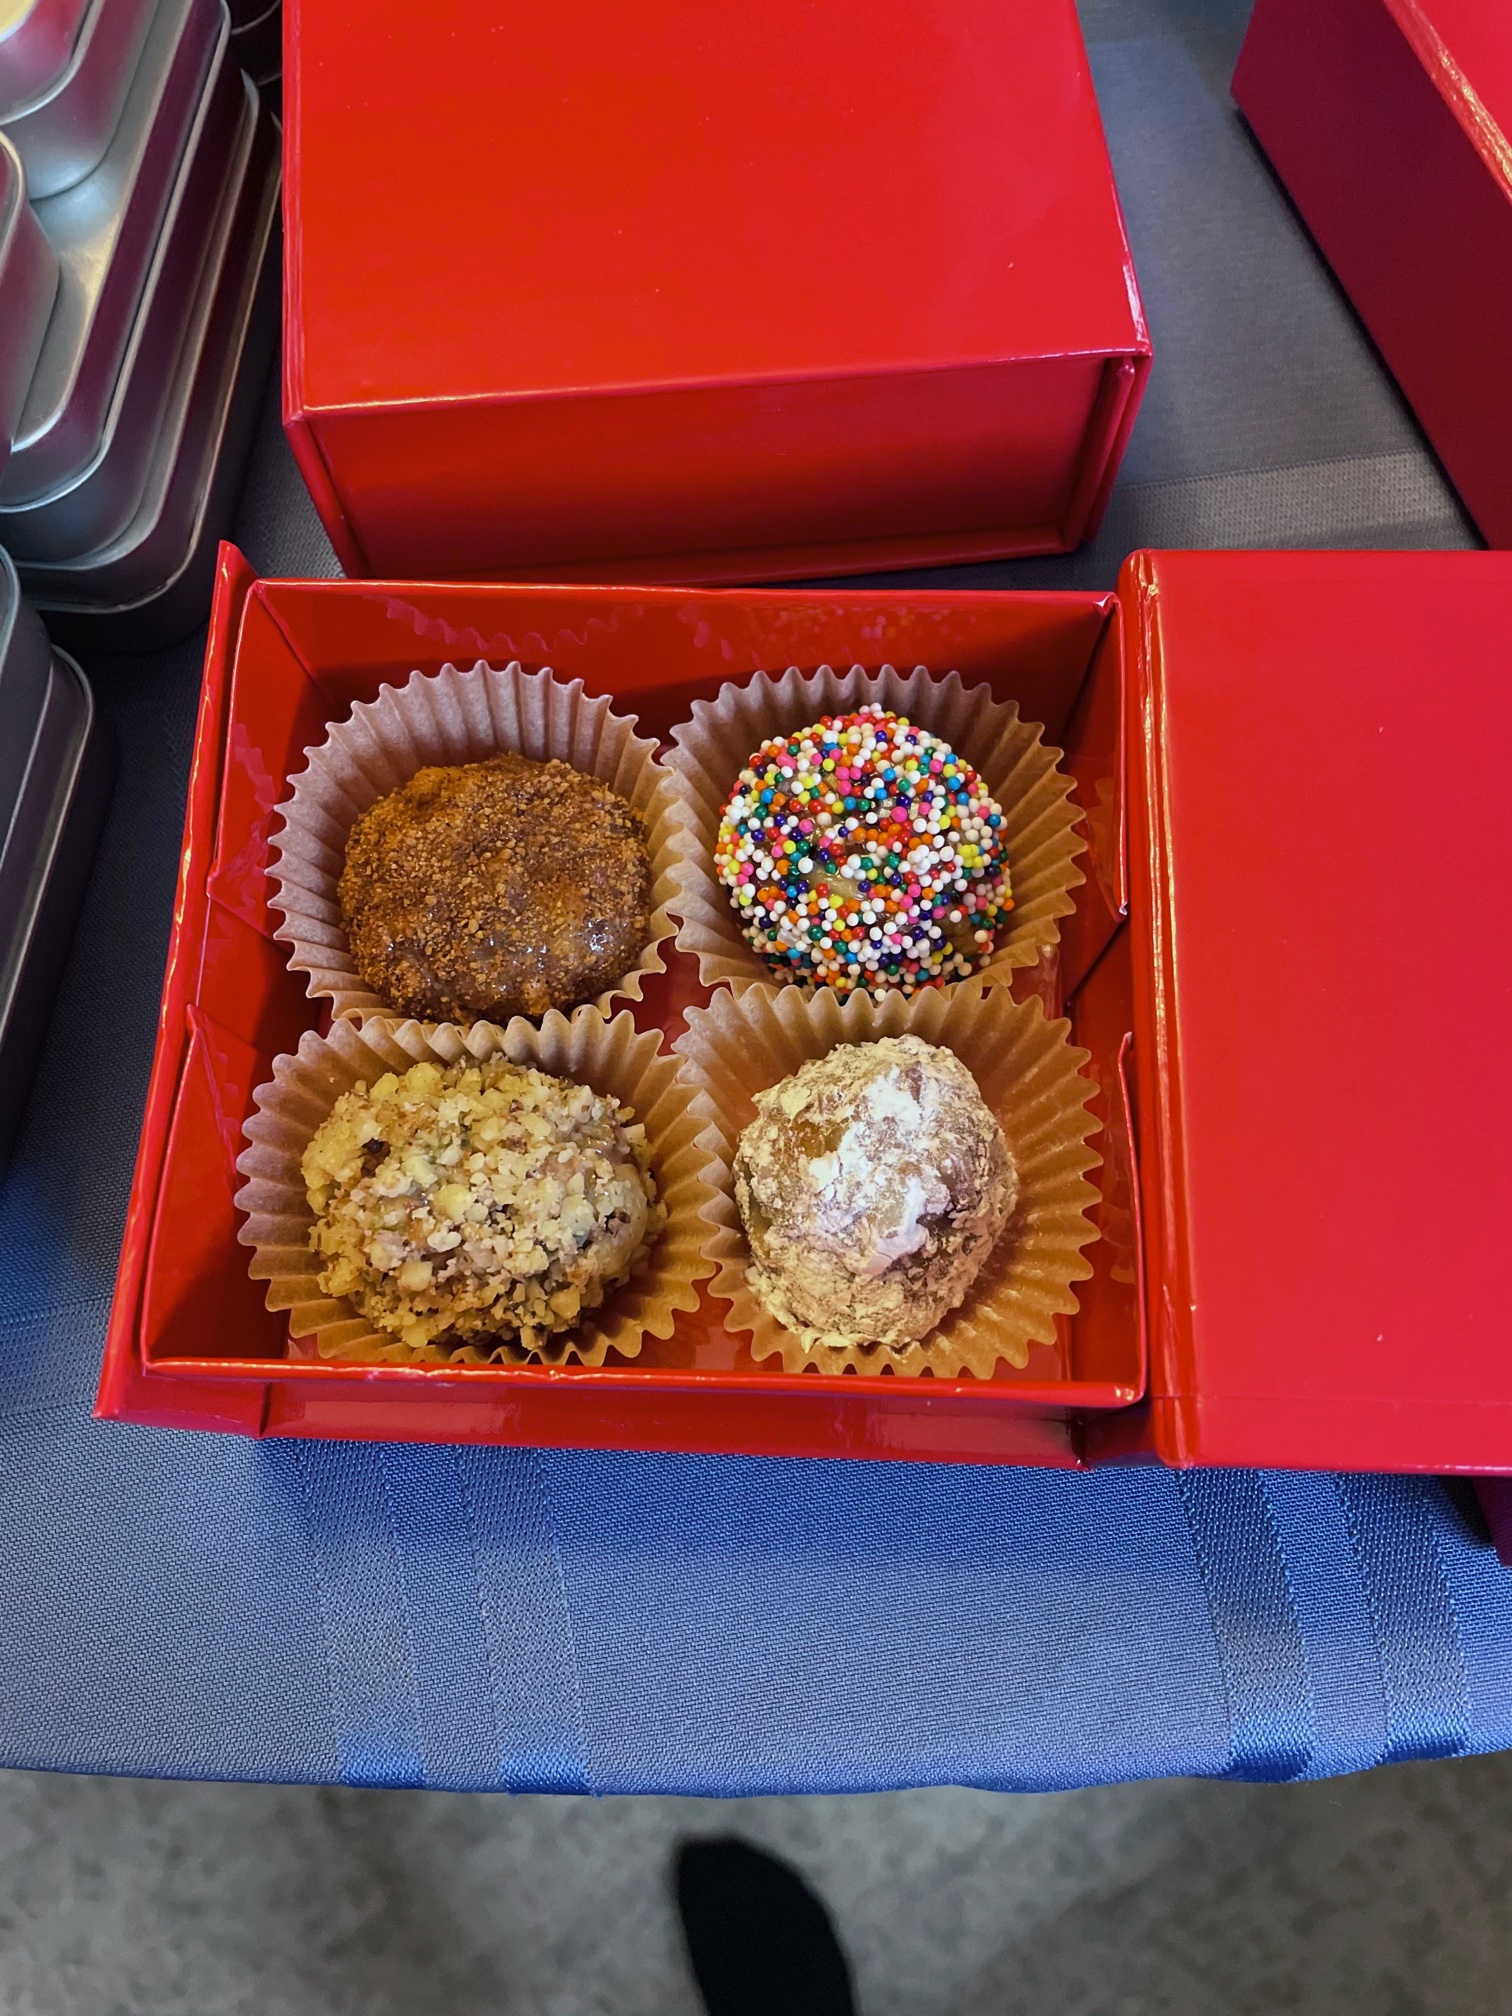
The assortment of toppings --- straight cinnamon is my favorite --- and some plain ones make them look very much like Dunkin Donut Munchkins.  My only concern is that someone might eat them and be surprised that they aren't airy donuts before realizing they're something even better: fruit cake.

My mother Mary is smiling down from heaven, proud that her granddaughters have taken a labor of love completed alone in her kitchen to new heights, with her great-grandaughter Emma's involvement signalling a bright future for family fruit cakes.

We toyed around with different names suitable for the re-engineered appearance, but none won approval before I wrote this blog, so I have temporarily dubbed them Proud Marys, a product of the team that had been rollin near the Schuykill River.

And hopefully in a deep base like Ike Turner's voice, you can hear, "Rollin' on the river."


Sunday, April 28, 2019

Chicken Redondo

I put a photo of Chicken Redondo on facebook yesterday, and my brother-in-law John commented that he couldn't find any recipe for a dish of that name on line.


That can't be right, I thought, because Julie and I have this about once a week.  It's a low-carb substitute for our old favorite, pizza.

My own search, however, found he was right, despite going directly to this blog specifically.

It turns out I was too clever --- or more accurately too foolish --- and had the recipe named "Instant Parmesan'll Get You."

Using chicken instead of eggplant was a twist on that Eggplant Parmesan recipe.

I then wrote a second recipe that's a variation (no sauce and cheese) a short time after the first, but that title isn't much more indicative of the dish: "My Name Is Chicken McLicken."

Then again, I have since changed the recipe since I originally created it, so now is as good a time as any to record that new one for posterity, or at least my original target, my adult kids.

I now line the glass baking dish with foil and then put parchment paper as a layer on top of the foil (Reynolds stopped selling the combined cooking sheets that was one of the building blocks of Q-CC).  That makes for that easy clean-up that has made Quick-Clean Cuisine a term used in every kitchen throughout the world, or at least in my kitchen.

I then pour about a cup and a half of Progresso Bread Crumbs on one side of the lined dish and a couple of tablespoons of extra virgin olive oil in the other half.

This will save the messiness of using a separate dish in milk or eggs, and if you're a Vegan, as our daughter Amy is now, it also makes the Eggplant Parmesan version of this recipe entirely Vegan.

As more of an Atkins Advocate, however, I usually make Chicken Redondo, which requires two boneless, skinless chicken breasts that have been re-cleaned beyond what the store butcher does (at least in the cheap chicken I buy), getting rid of any extra skin, veins of fat or things that just look gross.

Then, butterfly the chicken to make them not as thick.  Daughter Gina's mother-in-law Ria makes a great Wiener Schnitzel by pounding the chicken flat, but that requires extra tools and mess, so I just slice them thinner.  I also like to cut those thinner slices into smaller pieces, which makes them easier to apportion and also puts more oil and breading on each piece.

Simply lay the chicken breast pieces in the olive oil one at a time, turn that piece over and then repeat that process in the bread crumbs.  It is surprisingly effective.

Stack the chicken up inside the cooking dish as best you can, and if you need more oil or bread crumbs, either ask Julie to pour more in (and I have to wonder, what is Julie doing in your kitchen?) or wash your hands before pouring more.  Obviously, guessing the right amount initially is easiest, but I've found if you have a little too many bread crumbs, you can usually scoop them out to discard.  When all chicken pieces are breaded, spread them around the parchment paper-lined dish.

At that point, turn on the oven at 400 degrees for 40 minute (our oven has a built-in automatic cutoff).  I actually put the dish in as the oven pre-heats, but you can pre-heat the oven while you prepare the ingredients and cut the cooking time by maybe 7 minutes or so.  I set a timer for 25 minutes.

When the time goes off, there should be about 25 to 30 minutes left (I use a convection oven that adjusts my oven temperature to 375 and cooking time down too, but this isn't exact science).  Take the chicken pan out of the oven.  Add the pasta sauce to the top by pouring it on and spreading it with a spoon.  I like Francesco Rinaldi, Newman's Own or the Target brand, but that is a matter of personal taste.  Put the chicken back in the oven for another 15 to 20 minutes, depending you the type of oven you have.

Set the timer to buzz when you have about 11 minutes left on the baking time, if you have auto-shutoff.

Throw in handfuls of grated Mexican cheese to your personal taste.  I like to cover it like it's a pizza, which is to say, with plenty of cheese to cover everything, although I also go all the way to the edge.

Set another timer for 7 or 8 minutes --- or start the video below just before you put the dish back in the oven in lieuof a timer --- so you can check to see if it is done before the oven turns off automatically. The cheese should get browned but not completely degrade into brownish red mush, which doesn't taste bad but could be better.

When it is done, turn off the oven and take it out.


Monday, November 26, 2018

Grandma Mary's Fruitcake Rolls 2018: The Millennial Recipes!!!


This year at Thanksgiving, Gina bought supplies and organized production of three batches of fruitcakes.  I assume it took only slightly less time than writing her book, which is coming together as I type this blog.  After literally wrapping up the fruit cake project, Gina boarded a plane to deepest, darkest Africa to save the planet from itself.

The original version of Grandma's Fruitcake is always a favorite, but because Jay's fiancee Sasha requires a gluten-free diet, Gina put together a new version made with Honeynut Cheerios.  This may be adapted to regular Cheerios --- to reduce sweetness --- and 1/4 to 1/2 batch in the future.  However, once Jay and Sasha visit relatives or friends and hand out fruitcakes, having them be gluten-free avoids possible unintended consequences of eating gluten-rich original recipe as well as saving the efforts of making gluten-free versions of desserts for every occasion throughout the holidays.

While the Cheerios version may not be quite as awesome as the original, it is still better than the average fruitcake that comes out of the tin and lingers uneaten.  Jay has remarked that people at Universal Music initially turn up their noses at his offer of fruitcake around the holidays, but soon it is all gone and they're begging for more.

Amy is always thinking about how she can reduce her impact on the environment, so like Gina and her old Daddy before her, she decided to become vegetarian.

I stopped being a vegetarian before either of them were born, realizing that for me it just meant quickly gaining 20 pounds subsisting mostly on whole grain granola and peanut butter.

Gina also decided that for combinations of easier nutrition and lifestyle to move away from vegetarianism, although she certainly loves plenty of veggies, as long as they aren't mushrooms. 


Amy has taken vegetarianism a step further to become Vegan with a capital V, as in aVoiding all foods containing any type of animal product.  This includes butter and milk (presumably taken from a cow with her permission), eggs (ditto the innocent hen) or even marshmallows.  No, this is not part of an adopt a Marshmallow program, but gelatin contains some type of slaughter waste like skin and bones, but who wants to think about that?

Once again, for ease of sharing with friends and family, as a form of breaking bread together, a third version of the recipe went to a new Vegan formulation.

This one turned out a little mushy, as the Vegan materials apparently don't have quite the binding powers of the original, so I suggested possibly adding peanut butter, which seemed to have some appeal for next year.  

We should keep in mind, however, that peanut butter is the one thing that I always find a way to include in my diet somewhere.  Peanut butter is, after all, sort of low carb and certainly doesn't have a face, except Mr. Peanut, who doesn't seem to have an issue with eating his inner legumes.  However, what about all those non-talking peanuts?

While Gina did a lot before getting together for Thanksgiving, I was able to take off my long sleeves shirt and help with dicing the cherries this year.  It is a lengthy and sticky task, but I loved spending time with Gina, racing to see if my haphazard Japanese katana blade  approach ofcutting up five cherries simultaneously was really faster than Gina's precise single-cherry approach.  I will have to admit my end product might not have been quite as uniform, but that's what it means to be American: freedom of cherry-bit sizes!

The big production of fruitcake took place at Amy's new condo, and the kids each took a hand at stirring the big pot for three double batches.  Dollops were thrown onto wax paper that was rolled up.

After the second break, we took a break for a big pizza feast from John's, a Jersey City institution, including Pizza Marsala, which was especially good, followed by a good night's sleep.


Jay and Sasha headed into New York City the next morning to see the sights, promising to return by 4:00 PM, so the rest of us enjoyed the afternoon at Amy's place, including several rounds of Taboo and taking a walk down to the gorgeous Jersey City Waterfront with its panoramic view of New York City, including the World Trade Tower.  

An afternoon coffee break at Starbucks allowed Amy to try the Gingerbread Latte, which proved to be an excellent seasonal choice.  I split my usual favorite when I splurge at Starbucks, Caramel Macchiato, with Julie, although I was tempted by seasonal blends.  Emma devoured some oatmeal and popcorn.  Gina and Lukas had more standard Starbucks coffees.

Back at the fruitcake factory at 4:00 PM to meet the returning Knickerbocker-wannabes, we found Jay and Sasha had not returned as scheduled and wouldn't be there for another couple of hours.

The show must go on, so we went to the next phase of fruitcake making, the Santa's helper tasks of slicing and wrapping.

Armed with a knife half as long as her arm, Amy sliced the fruitcakes into uniform slices, beginning with gluten-free so as not to infect the cutting board or knife with chewy, delicious gluten.

Meanwhile Julie was cutting wrapping paper in rectangles.

We would then wrap the fruitcake rolls in wax paper before wrapping them in colorful wrapping paper in an assembly line of Gina, Emma and me.

Red paper meant WARNING, NO GLUTEN HERE!  Green was extra eco-friendly, and no real marshmallows were killed in the production of this fruitcake.  Finally blue was for the original Blue Ribbon standard.

Anyway, the revised recipes have been included below, so that Grandma Mary's fruitcake tradition so lovingly passed forward can continue.

Phase 1: Purchase and Assemble Supplies (Completed in Wynnewood, Pennsylvania by Gina)

The fact that Gina did this pretty much single handedly is quite impressive.  Those cherries and dates in particular can get pretty hard to find as well as costly, and Gina has never taken credit for bearing those financial and opportunity costs, something her new Personal Coach in Efficiency may find objectionable for future years.  Here is the recipe Gina asked me to save in this blog:

Fruitcakes: Original version + vegan + gluten-free
Phase 1 – Shop
·         3 lbs (or a bit less) candied cherries (half red/half green)
·         3 lbs (or a bit less) dried dates
·         At least 18 cups pecans, chopped
·         At least 12 cups walnuts, chopped
·         2 lbs graham crackers (crumbs if available) – only for original and vegan

·         1 lb gluten-free alternative to graham cracker crumbs (Honey Nut Cheerios)

·         8 sticks of butter (salted) – only for original and gluten-free
·         2 lbs marshmallows – only for original and gluten-free
·         2 small cans condensed milk – only for original and gluten-free

·         2 cups of vegan butter alternative
·         1 lb vegan marshmallows 
·         1 1/3 cup vegan condensed milk alternative
       (These were hunted down and purchased in Jersey City by Amy, including stopping at a few stores   with me to get Vegan marshmallows.)


·         3 large bowls
·         6 large-ish Tupperware for half-batch dry ingredient storage (two each red, green, blue)
·         1 large pot (start with gluten-free, wash between each batch – hopefully available at air bnb)
       Wax Paper
       Tape
       Color-coded plastic containers for the fruit rolls as well as a large bin to carry the assembled   materials.

·         Wrapping paper * 3 to distinguish batches (red, green, other)


Phase 2 - Chop (Completed at Air BnB in Jersey City, New Jersey)

·         Chop cherries
·         Chop dates
·         Chop pecans to make 18 cups
·         Chop walnuts to make 12 cups
·         Crushed graham crackers (or buy crumbs) – only for original and vegan
·         Crushed gluten-free cereal
·         Separate all of the above chopped/crushed ingredients the above to 3 batches
·         Original, Gluten-Free, and Vegan.
·         Pro-tip: Add dates piece by piece into crumbs to avoid clumping.
·         Mix and store

Phase 3 – Combine (Completed first day at Amy's condo in Downtown Jersey City)
·         Set up ~96 wax paper rectangles  ~7 inches wide (reserve 48 nicest ones for re-wrapping)
·         For half of the gluten-free batch
o   Melt 2 sticks of butter and then add 1/2 lbs of marshmallows, stir until melted
o   Add ½ can of condensed milk
o   Stir in 1 batch of fruits, nuts and crumbs (gluten-free version)
o   Quickly transfer to wax paper, shaping to a log
o   Tape and refrigerate overnight
·         For the original batch
o   Melt 2 sticks of butter and then add 1/2 lbs of marshmallows, stir until melted
o   Add ½ can of condensed milk
o   Stir in 1 batch of fruits, nuts and crumbs
o   Quickly transfer to wax paper, shaping to a log
o   Tape and refrigerate overnight
·         For the vegan batch
o   Melt half of butter alternative (1 cup) and then add 1/2 lbs of vegan marshmallows, stir until melted
o   Add ½ can of vegan condensed milk alternative
o   Stir in 1 batch of fruits, nuts and crumbs
o   Quickly transfer to wax paper, shaping to a log
o   Tape and refrigerate overnight – store in color-coded wrapped boxes?

Phase 4 – Slice and wrap (Completed second day at Amy's condo)

·         Remove each roll, and slice thin, starting with gluten-free, washing all before vegan batch
·         Re-wrap in fresh wax paper
·         Cover with wrapping paper by batch

Thursday, April 28, 2016

Meatloaf Cole Slaw Salad

If you don't have a bag of cole slaw in your refrigerator, make a point to buy some the next time you go to the grocery store.

It makes a healthy side dish quicker than you can say, "Non tutte le ciamelle riescono col buco."

Some cole slaw comes with a packet of salad dressing inside, but I prefer to buy the kind without dressing and then mix in Paul Newman's Own Honey Mustard Dressing or an equivalent.  Of course, you can use other salad dressings if you prefer, but honey mustard goes with a lot of meals.

It tastes especially good with barbecued meats.

What I've realized recently that putting a slice of cold leftover meatloaf into a big bowl of cole slaw makes a delicious, satisfying meal.

Add some chunks of tomato and, if it is available where you live, avocado to add to the flavor and nutrition.

There you have it, a delicious meal in a bowl.

And that's just one way to add a little ruffage in place of bread and heavier dough products.

You'll soon look at your cole slaw lovingly and say, "Sei come il prezzemolo!"

(Italian lesson courtesy of http://www.foodrepublic.com/2011/12/14/100-italian-fooddrink-words-and-phrases.)

Monday, June 8, 2015

Low Fat Fiesta

Sometimes, you just want some good old junk food, or possibly some modestly healthy take on good old junk food.

When Julie and I go to The Lighthouse Cafe in Hermosa Beach for live jazz on a weekend day, we occasionally will buy their nachos.  What they bring to our table must be four iches high and fills a platter about a foot in diameter.  By comparison, consider the movie theater version of nachos: 40 chips with 4 ounces of "cheese" in a little cardboard tray. 

Yes, the Lighthouse Nachos are a terrific value and can easily feed a table full of people, but sometimes we tackle it with two or three people,  getting suprisingly far through layer after layer of tortilla chips, cheese, beans, guacamole, sour cream and, to make us feel like we're eating vegetables, pico de gayo and sliced jalapenos.  Add chicken for a couple of bucks more, and still pay less than the price of two movie theater trays of chips and Queso.  There must be ten movie theater nachos in that pile of goodness.

Diners can gloat in value-shopping awesomeness, because  the live jazz show is usually free, as opposed to a $12 movie theater ticket.


However, consider this: typical movie theater nachos are about 1,100 calories with 59 grams of fat, a third of which are saturated, if that means anything to you.


In short, you have to be very tall or a professional athlete to get away with splitting the Lighthouse Nachos between four people without exceeding your daily recommended calorie intake.

But perhaps you still want that spicy flavor with some crunch.

Here is an easy and tasty Quick-Clean Cuisine Low Fat Fiesta recipe that makes a tasty dinner, lunch or snack.

Cover a cookie sheet with parchment paper, and then put two or three of your favorite flour tortillas on it.  Avoid overalapping tortilla edges, but they can hang off the side of the cookie sheet a little if necessary.  I usually buy thin and cheap Romero's tortillas for myself and Mission Low Carb tortillas for Julie.  For this reciepe, I strongly recommend regular tortillas, as thin as possible (lower calorie), because they toast better than the low carb ones.  This is a splurge treat, after all, not an every day meal.  You can cut them into chips or strips if you like, but I usually just make gigantic round tortilla chips.

Preheat the oven to 400 degrees and stick the tortillas in the oven while it warms up.  Set a timer for about 6 to 10 minutes, depending on how fast your oven heats.  If it is super fast, check at 3 or 4 minutes to make sure the tortillas aren't burning.  Once you know how long it takes cooking them one time in your oven, adjust your time for your oven for future tortilla bakes.


Now that you have your "chips" cooking, open a can of Rosarita No Fat Zesty Salsa Refried Beans. Yes, this is haute cuisine with complex, top of the line ingredients, but you can substitute whatever refried beans you like, and you'll still be better off than movie theater nachos.
 
Put half of a 16 ounce can of beans (or however much you think you will eat, adjusting cooking time) into a microwave safe bowl.  Stir in one to two table spoons of grated Mexican cheese.  If you happen to have some leftover taco meat, you can add that too, but it isn't necessary. 
 
Thoroughly cover the bowl in wax paper, because beans can splatter if it gets too hot (no es bueno para Q-CC, si?).  Heat it for about 60 to 90 seconds.  If it isn't hot when you check it, stir it and put it back in for another 30 seconds.

Check to see if your tortillas are light brown.  If they are, take them out of the oven and proceed to enjoy them.  Keep checking until they're done, and then make a note of how long it took.  Eat off a plate or even a napkin or paper towel, if you find rinsing a plate lightly to be too strenuous.

My closing comment will only be clearly understood by those who went to a high school like mine that served refried bean burritos from a stainless steel food truck on campus.  The toasted tortilla with beans tastes almost exactly like those high fat chimichanga-like burritos deep fried by the food truck.

I think you can figure out how to clean up after this meal, but the most complicated part is that you will, if you followed the recipe exactly, have a half can of refried beans leftover.  Rather than washing the bowl, you can, assuming you will be eating your leftovers, put the rest of the refried beans in with another 1 or 2 tablespoons of grated cheese, cover it with Cling Wrap and put it in the refrigerator for another fiesta in a couple of days.

By the way, I suppose this should be enough for two people, but if you eat it all, you're still not going to hate yourself in the morning.


Friday, May 15, 2015

Baked Chicken Breast With Low Carb Stuffing

Have you ever noticed that when you go to a fine dining establishment like McDonalds, a non-battered-and-fried chicken breast sandwich often costs more than a hamburger, but at the grocery store, chicken usually costs less than beef?

At home, barbecuing either meat takes about the same amount of effort, but if like me your apartment doesn't have outdoor space sufficient for a barbecue, you must look instead at your stove, wondering how much grease will splatter when pan frying a burger.  The idea of baking a burger is somehow simply wrong, although meat loaf is a tasty alternative if you can wait over an hour to eat.

Believe it or not, baking chicken is pretty easy and takes about half an hour.  With the help of Reynolds Non-Stick Pan Lining Paper, it can even be Quick-Clean Cuisine.

In addition to Pan Lining Paper, you will need:

6 pieces of Low-Carb Bread
*2 fresh (not frozen) boneless, skinless chicken breasts.
sprinklings of ground thyme
sprinklings of ground pepper
1/2 cup of shredded carrots
1 large celery stalk
1 table spoon of onion flakes
8 ounces of chicken broth

To make this as quickly as possible, you need to be able to make toast at the same time you prepare the chicken.  It's not rocket science, but if it makes you feel less stressed, you can make the toast before starting the chicken.

Toast 6 pieces of bread  

Pre-heat  your oven to 400 degrees.

In a lined baking dish, trim the boneless, skinless chicken breasts into thinner fillets.  Hand trim any excess fat or skin that will most likely be present. 

Sprinkle the chicken lightly with thyme and pepper.  That's sufficient seasoning to create a tasty meal, because chicken has a somewhat salty flavor naturally (although perhaps I find that true because I insist on buying only chickens raised on Frito-Lay products served from pottery bowls made by Navajo native Americans rather than chickens who subsist on whatever they manage to peck out of the dirt).

Put the chicken dish in the pre-heated oven and set a timer for 15 minutes.

On the plate you will be eating from, cut the toast into strips and then cross-wise into cubes.  I've found I can cut about three pieces of toast into strips at a time without squashing them too much, but then cross-wise seems to be less predictable.  In any case, don't spend more than five minutes making cubes from all of the toast, or you're being too exacting and will face a government crackdown.  Similarly cut celery into small pieces. 

Put the diced toast and celery in a sauce pan with onion flakes, shredded carrots and chicken broth, along with light sprinklings of pepper and thyme.  Stir as it cooks over medium heat on the stove top

When the timer dings (or 15 minutes passes, for you Luddites who refuse to use the latest timer technology), take the chicken dish out of the oven and transfer the stuffing out of the sauce pan and into the dish with the chicken.  Most of the stuffing should be on top of the chicken.

Put the dish back in the oven to bake for another 15 minutes.

While the chicken and stuffing bakes, wash and dry the sauce pan in which you made the stuffing.  Yes, this is a lot more work than typical Q-CC but significantly less than preparing Thanksgiving Dinner.

When the timer dings, TURN OFF THE OVEN, and check to see if the chicken and stuffing look done. They probably are, but if not, check your facebook page before plating it for dinner.

This has proven to be exactly enough for two people to eat, but for one person, there should be a nice leftover meal to enjoy for either lunch or dinner in the next day or two.  Simply put the leftovers into a small microwavable dish, cover  with Saran Wrap and refrigerate.

Wash your plate, and then wad up the pan lining paper and put the baking dish away.  Cleanup complete.

*You might prefer legs or wings, but I usually buy boneless, skinless chicken breasts (not to be confused with split chicken breasts, which also work for baked chicken, although I recommend skinning them before cooking, and obviously you also will have leftover bones, too, making them less q-cc compatible).  Frozen chicken also works, but you obviously need to allow more time for it to cook.  Adding this asterisked item adds a certain amount of professionalism to this recipe, which will make you take it more seriously.  If you always buy boneless, skinless chicken breast, you don't need to read this section.  Carry on.